I enjoyed my TS-850 for about 6 months, and then the antenna tuner started acting up. It wouldn't tune correctly, and sometimes just didn't seem to try and find a match.
I did a bit of research searching the web, and found that this was a common symptom for the internal battery wearing out. The battery also can leak and ruin the digital circuit board.
However, before you open up the rig to change the battery, check one thing - you must have the carrier control up enough to give enough drive to get the tuner to work.
You can totally ruin your radio if you do the wrong thing here. You're on your own - if you feel confident with a soldering iron and small circuits, you can do this work. Don't hold me responsible, however, for whatever you do.
To change the battery, and replace it with a clip adapter, first gather your parts. You'll want a 3v, long-life battery (lithium) and a clip holder. You'll need a good, small soldering iron plus solder removal tools - I like to use the "solder sucker" type; others prefer the wick approach. If you've never removed components from a circuit board, don't start learning on your rig - practice a bit on some trashed circuit board before diving in.
To get to the battery, remove the top screws (not the from around the speaker grill) and the ones around the sides and bottom. Carefully remove the top and unplug the speaker cable. Put the top and bottom aside in a safe place, and store the screws in a small container so you won't lose them.
Next remove a screw from the left and right top of the front panel so you'll be able to fold it down. You may need to loosen the bottom screws slightly, and place something under the radio so you have clearance for the knobs as you fold it down.
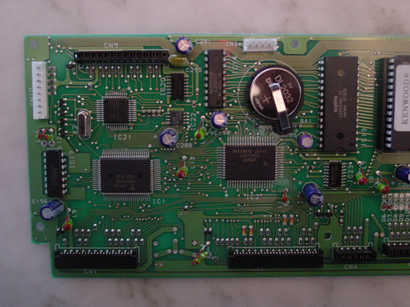
You'll now be looking at the digital board, and see the battery in the middle, a bit towards the left side.
Remove this board by unplugging all cables and removing all screws. Don't force anything, and don't pull on the wires going into any of the connectors.
Finally, when you have the board out, unsolder the old battery and replace with your clip. Be sure to get the polarity correct - on mine, the clip went in the 'right' way and supported the battery from the bottom.
Before you put it all together, consider doing the 60m mod. If you have the board out now, and can handle moving one diode, it's an easy change.
Here's a picture of the final results:
If you have questions, you can contact me via email with my callsign at arrl.net
73,
- Dave
W6OT
Fine Print Disclaimer - this worked well for me, but may not for your particular radio. If you wire things wrong, you may damage your radio and/or yourself. The author makes no guarantees about anything.